Masts
My mast for my 45 sqr foot lugsail was 11ft long. It tapered from 38mm diameter to 65mm diameter at the base. Scow Proa has 2 masts, each of 70 sqr feet sail area, mast height being 16ft. Thus mast needs to be stronger, thus on my judgement a solid wood tapered mast tapering from 45mm diameter at the top to 75mm diameter at the base will be adequate.
Mast bury figure
The more the better. By having a relatively low rig for a boat, loads are reduced, having the mast partner high reduces loads. Whereas I have 40cm of bury, ScowProa has 80cm. This should be a most adequate figure
Framing
My small boat has frames at 50cm centers. I found this worked well, but would have preferred framing more closely spaced. Thus I have specified frames at 40cm centers. I used one-inch square framing because that was easily available. Almost all framing in boats has more depth than width. I would use framing of 19mm wide with about 30mm depth in the cabin. On the inside of this I would add a thin ply backrest running lengthwise. This backrest would protect against banging occupants against frames, and creates a defacto I-beam, giving great strength.
Inside the end compartments, width is not constrained, thus frames can be made the ideal size, I would say maybe 19mm wide with 40mm depth, if narrower and deeper was available that may be preferable, if 15mmx 50mm was available, that would be stronger.
For deck framing I would use light (say 19mm x 30mm framing on 20cm centers) underneath 4mm plywood. The main purpose being to provide strength so that people walking on the deck do not fall through
Safety Ama
This is added for safety. In normal circumstances it never touches the water and as such can be lightly built. It has a volume of approx 280L making a significant contributon to stability. The reason why a separate safety ama has been shown as opposed to an integrated ama is to allow for rotation of the leeboard. The safety ama can be removed if desired.
Stability
I like to be conservative with this. Thus I have specified a rig of modest sail area and a low center of effort. The single folding outrigger provides for a greater beam and thus righting moment than a boat made for the 8ft trailering width. Stability is also assisted with my having a low center of mass. As opposed to a catamaran, Scow Proa has the cabin and it's content low down.
The safety ama provides protection against capsize. It adds a little to overall weight, however it can be built very lightly as it is not structural and in normal circumstances never touches the water
Outrigger weight
A light outrigger is easier to move when the boat is being assembled/disassembled. If built with just light plywood it could be built at 25kg or less. However I feel that additional weight is prudent as it assists in righting moment and increases drag only modestly. This can be done by a two water-tanks with large openings that are filled quickly by pouring in water from a bucket. To add another 30L or water would only take 90 seconds or so. One this is done, adding a lid and securing it with a couple of screw/wing-nuts would only take another 30 seconds or so
Double Bottom
It was always my intention to give ScowProa a double bottom. The distance between the false floor and the true bottom may be only 35mm. In this gap, lengthwise stringers and crosswise framing would be placed. For a modest loss of height great advantages in structural integrity is obtained. A smooth flat cockpit floor is obtained too.
Crossbeam Dimensions
Mine are 100mm x 110mm. I made mine out of wood top and bottom with plywood sides. I am pretty happy with them, though I admit they are oversized for my boat. I tested them by having 3 people totally 250kg standing at midpoint, whilst the ends were supported on a couple of bricks each. It felt very rigid and strong at this load. For ScowProa I would go with 110mm square. I would use wood on all four sides. I would make in a jig (I would use a ladder, as I have that laying around and it is suitable) in order to ensure there is no warping in either plane. A jig is just a long straight structure. with a vertical backrest, in which the crossbeams are placed during manufacture, to ensure they are straight.
Obviously there are spacers every 2ft or so. I made these on the table-saw, I made one, and then made another 15 or so exactly the same size, accurate to about a millimetre or so, which is relatively to do on a table-saw with a cross-cutting mechanism.
Stitch and Glue vs Hard Chine stringer frame
I personally really dislike stitch and glue. I made my dory with that method and the hull went together in 2 or 3 days. However I found it messy and difficult. I know that for some it works well and for small simple boats it is probably an ideal method. For larger boats I much prefer to build on a strongback. A strongback can be made simple, just imagine a ladder style structure but pegged into the ground. From that basis frames are added, then lengthwise chine logs. This structure is then epoxied, then later the same day a paste is made of epoxy and microspheres, and slightly oversized plywood is stapled on. A cheap $30 electric stapler works well.
The inside of the plywood is epoxied before stapling it to the frame. After a couple of hours the staples are removed. My friends an I build a complete outrigger in 2 easy days. One day to make the frame, one day to apply the plywood, it worked very well.
Plywood thickness
I used 4mm for sides and 6mm for the floor, with framing this is adequate though not excessive. Increasing to 9mm for floor would have been fine. Good quality ply is essential, cheap plywood is rubbish and a waste of money. For ScowProa I would use 6mm sides and 9mm for the bottom. This is combined with framing to proved strength. Seams are fiberglassed on the outside.
Lee board
The board is Ogive section. By that I mean it is symmetrical fore and aft, but is more rounded on the outrigger side to produce more lift. Now a rule of thumb is that a board should be of 4 percent of sail area for a dingy, but when I read some multihull posts they are going for 2 percent area, I think it call comes down to judgement. Now sail area approximately 130 sqr feet, say use 3 percent board area as a rough estimate, this gives 4 square feet of board area. So a first attempt at board size might be 2.6ft x 1.5ft chord.
Hullshape arrangement
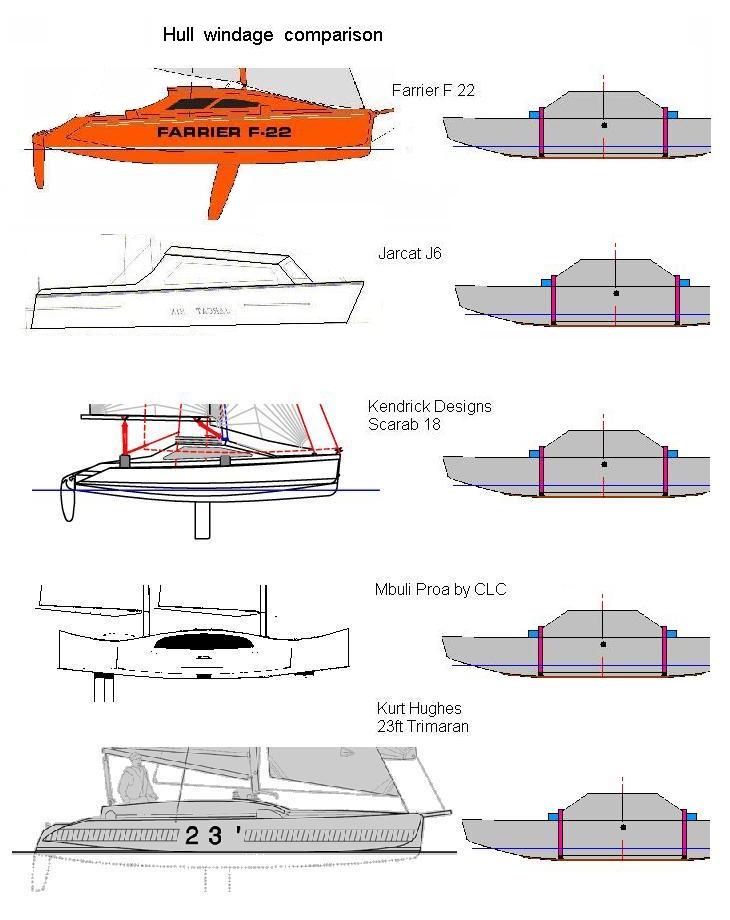
This is tricky. I am no expert and I realise that I make mistakes. I can now see that minimizing cabin height just so as to reduce windage makes for a very small cramped boat. I take my mind back to when I was doing the original scow proa sketches and I was comparing to the Mbuil proa by CLC. Now Mbuli has a really, really low cabin, basically you lie down in it and can just sit up if required. Apparently CLC sold a LOT of plans for that boat. I do not know how, as I do not have a high opinion of it (not that my opinion carries a lot of weight!)
Windage comparison
ScowProa has evolved from a one person boat designed for the sea to a 2 person boat for more protected waters. As such more windage is deemed permissable. The intention is to give comfortable sitting headroon, and this turns out to be approximately 4ft. Now with a sinkage of approximately 6 inches, that leaves approx 3.5ft of windage. Now the heavily sloped sides of ScowProa means that this 3.5ft has less windage of a conventional cabin of similar height. Looking at the above diagram it can be seen that ScowProa cabin is lower than the Farrier and Jarcat boats, is similar in height to the Kendrick designs tri and it higher than the Mbuli proa and the Kurt Hughes 23ft tri
Conclusion, whilst there is always a desire for less windage, it does not seem excessive for a boat designed for comfort in protected waters
Hull offsets and design file
Some notes on the above hullform file. The design shown is based on a symetrical design whereas a real life craft would have hull assymetry with more flare on the outrigger side and additionally it would have a narrower width of the hull bottom. The design and offsets are a little rough and need fine tuning. The purpose of the exercise was to get a general idea of draught, freeboard, waterline length etc based on a realistic displacement. From this starting point refinements can be made whilst knowing what sinkage the craft will encounter.
Please note that this design was based on a vertical bow transom, as opposed to an inclined bow transon that a real-life craft would have, and hence the above craft is depicted as 10cm shorter than the true version. The reason for doing this was to simplify the design process, which is difficult enough as it is. In time I can get the computer to add an inclined bow transom, but it takes a little time.
For those wishing to see the file please contact me and I happy to email it to you